 Save
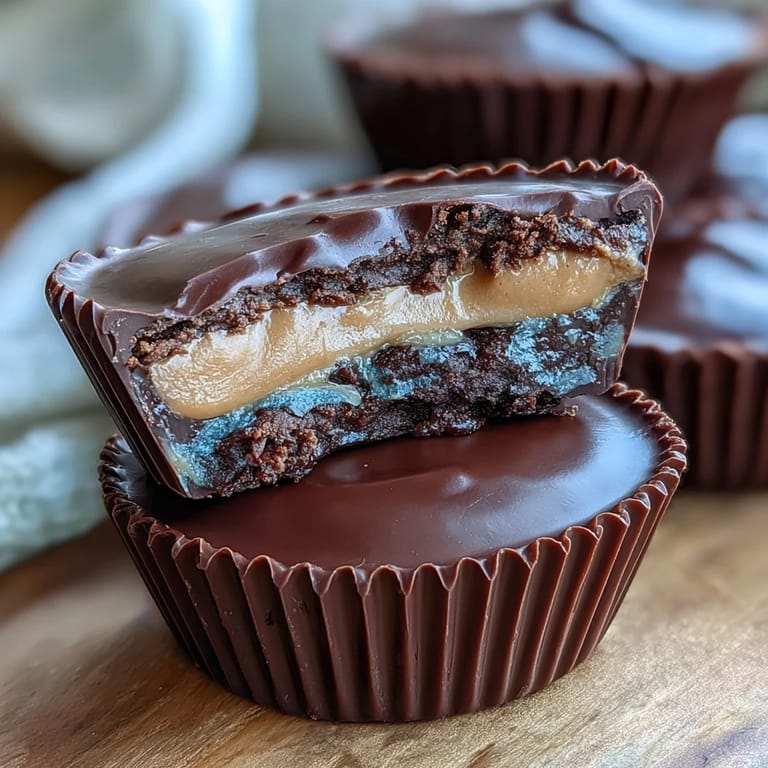
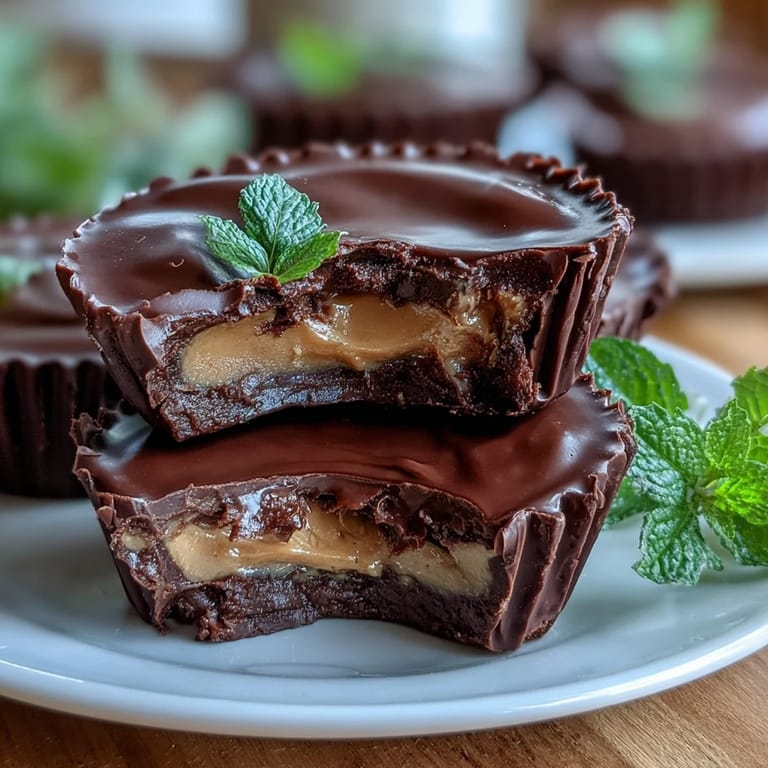
Save There's something magical about making your own peanut butter cups at home. These Homemade Reese's Peanut Butter Cups with Dark Chocolate take the beloved classic candy to new heights with rich 70% dark chocolate and a perfectly balanced, creamy peanut butter filling. Unlike store-bought versions, you control the sweetness, the quality of ingredients, and can customize them to your exact preferences. The combination of slightly bitter dark chocolate with sweet, salty peanut butter creates an irresistible contrast that's both nostalgic and sophisticated.
Save The beauty of this recipe lies in its simplicity and versatility. With just a mini muffin tin and a few quality ingredients, you can create confections that rival any artisan chocolatier. The optional coconut oil in the chocolate layer creates a perfectly smooth, glossy finish, while the addition of vanilla extract and sea salt in the filling elevates the peanut butter from ordinary to extraordinary. Whether you're making these for a special occasion, as an after-dinner treat, or simply to satisfy a chocolate craving, they're guaranteed to impress.
Ingredients
Tired of Takeout? 🥡
Get 10 meals you can make faster than delivery arrives. Seriously.
One email. No spam. Unsubscribe anytime.
- Chocolate Layer: 250 g (9 oz) dark chocolate (70% cocoa or higher), chopped; 1 tbsp coconut oil (optional, for smoother texture)
- Peanut Butter Filling: 120 g (½ cup) creamy peanut butter (unsweetened, unsalted preferred); 2 tbsp unsalted butter, softened; 60 g (½ cup) powdered sugar, sifted; ¼ tsp fine sea salt; ½ tsp vanilla extract
Instructions
- Step 1: Prepare the Muffin Tin
- Line a 12-cup mini muffin tin with paper liners.
- Step 2: Melt the Chocolate
- Melt the dark chocolate and coconut oil together in a heatproof bowl set over a pan of simmering water, or microwave in short bursts, stirring until smooth.
- Step 3: Create the Chocolate Base
- Spoon about 1 teaspoon of melted chocolate into the bottom of each muffin liner. Tilt or use a spoon to coat the sides slightly. Chill in the freezer for 10 minutes to set.
- Step 4: Make the Peanut Butter Filling
- Meanwhile, in a medium bowl, mix peanut butter, butter, powdered sugar, salt, and vanilla extract until smooth and thick.
- Step 5: Add the Filling Layer
- Roll about 1 teaspoon of the peanut butter mixture into a ball, flatten slightly, and place onto the set chocolate bases. Gently press down to create an even layer, leaving a small border around the edge.
- Step 6: Seal with Chocolate
- Spoon the remaining melted chocolate over the peanut butter layers, covering completely. Tap the tin gently to smooth the tops.
- Step 7: Chill and Set
- Chill in the refrigerator for at least 30 minutes, or until fully set.
- Step 8: Serve and Store
- Remove cups from liners and serve. Store in an airtight container in the refrigerator for up to 1 week.
Zusatztipps für die Zubereitung
For the smoothest results, ensure your peanut butter is at room temperature before mixing with the other filling ingredients. This makes it easier to achieve a uniform, creamy consistency. When melting the chocolate, be patient and use gentle heat to avoid scorching, which can make the chocolate grainy and bitter. If your chocolate becomes too thick, a small amount of additional coconut oil can help restore its fluidity. For perfectly even cups, use a small offset spatula or the back of a spoon to spread the final chocolate layer, ensuring the peanut butter is completely sealed inside.
Varianten und Anpassungen
This recipe is wonderfully adaptable to different dietary needs and flavor preferences. For vegan cups, simply substitute the unsalted butter with dairy-free butter and verify your chocolate is dairy-free. Adventurous bakers can experiment with almond butter or cashew butter for a different nutty profile, or try adding a tablespoon of cocoa powder to the peanut butter filling for a chocolate-peanut butter swirl effect. For those who prefer milk chocolate, substitute half the dark chocolate with quality milk chocolate. You can also add crushed pretzels to the peanut butter layer for a delightful salty crunch, or fold in mini chocolate chips for extra decadence.
Serviervorschläge
These peanut butter cups are incredibly versatile when it comes to serving. Enjoy them straight from the refrigerator for a firm, satisfying bite, or let them sit at room temperature for 5-10 minutes for a softer, more melt-in-your-mouth texture. They pair beautifully with a hot cup of coffee or espresso, where the bitter notes of both the chocolate and coffee complement each other perfectly. For an indulgent dessert, serve alongside a scoop of vanilla ice cream or a glass of cold milk. They also make excellent edible gifts when packaged in decorative boxes or bags, perfect for holidays, birthdays, or as a thoughtful homemade thank-you present.
 Save
Save Making your own peanut butter cups is not only rewarding but also allows you to create a treat that's perfectly tailored to your tastes. Whether you prefer them extra dark and less sweet, or with a hint of sea salt on top, these homemade versions offer endless possibilities. The satisfaction of biting into a cup you made yourself, with its layers of glossy chocolate and creamy peanut butter filling, is unmatched. Keep a batch in your refrigerator for when you need a quick sweet fix, or present them as gifts to fellow chocolate enthusiasts who will appreciate the homemade touch and quality ingredients.
Your Questions Answered
- → What type of chocolate is best for these cups?
Dark chocolate with 70% cocoa or higher works best for a rich flavor and smooth texture.
- → Can I substitute the peanut butter?
Yes, almond or cashew butter can be used for a different nutty twist while maintaining creaminess.
- → How do I make these cups vegan?
Use dairy-free butter and check that the dark chocolate contains no milk solids to keep the cups vegan.
- → Why add coconut oil to the chocolate?
Coconut oil helps create a smoother, shinier chocolate coating and improves the texture when set.
- → What is the best way to store these cups?
Store in an airtight container in the refrigerator for up to one week to maintain freshness and texture.
- → Can I add sea salt on top?
A light sprinkle of flaky sea salt before chilling enhances flavor by balancing the sweetness and richness.