 Save
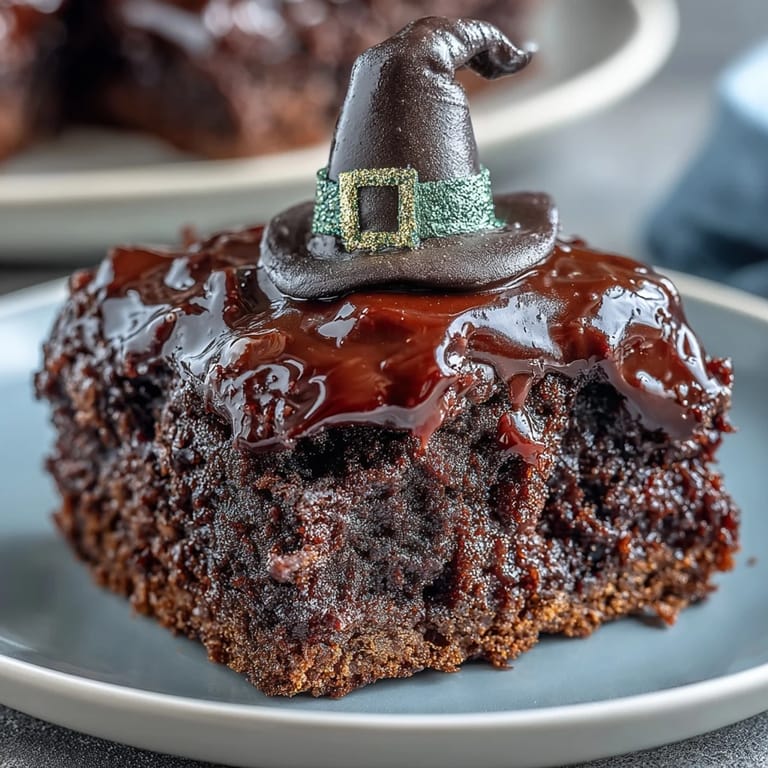
Save My nephew knocked on the kitchen door last March with that mischievous grin only a six-year-old can manage, asking if we could make something green for St. Patrick's Day. I had no leprechaun hat expertise, but I did have brownie batter and marshmallows, so we invented these little hat-topped bites together right there on a Tuesday afternoon. What started as me showing him how to dip marshmallows turned into him declaring these "way better than regular brownies" and requesting them for every holiday afterward. These have been our tradition ever since.
I brought a batch to my office on St. Patrick's Day a couple years back, and watching grown adults actually smile and get excited about the little chocolate hats was unexpectedly joyful. One coworker kept calling them "tiny leprechaun mansions" and somehow that name stuck. Now people ask about them months in advance, which feels like the highest compliment a recipe can receive.
Ingredients
- Unsalted butter (melted): Melted butter creates a denser, fudgier crumb than oil ever could, and it gets incorporated so smoothly when you whisk it with sugar.
- Granulated sugar: This amount balances the cocoa without making the bites cloyingly sweet, letting the chocolate flavor shine through.
- Large eggs: Two eggs bind everything while keeping the texture tender, not cakey.
- Vanilla extract: One teaspoon deepens the chocolate flavor in a way you won't consciously notice but will definitely feel in your mouth.
- Unsweetened cocoa powder: Sift it to avoid lumps in your batter, which honestly took me three batches to learn the hard way.
- All-purpose flour: This keeps things sturdy enough to hold the hat decoration without turning heavy.
- Salt and baking powder: Salt enhances cocoa flavor while baking powder gives the brownies just enough structure to rise without becoming airy.
- Large marshmallows: Buy the standard large size, not the mini ones, since you need something substantial enough to sit atop each brownie.
- Dark or semisweet chocolate chips: I use semisweet when I want it sweeter, dark when I want the chocolate to have more personality.
- Chocolate wafer cookies: These form the brim of the hat and need to be thin and round, about the size of a large coin.
- Green icing: Homemade buttercream tinted green works beautifully, or grab store-bought to save time.
- Gold sprinkles or edible glitter: These become the decorative buckle on the hat band and make everything feel festive without being overpowering.
Tired of Takeout? 🥡
Get 10 meals you can make faster than delivery arrives. Seriously.
One email. No spam. Unsubscribe anytime.
Instructions
- Get your oven and pans ready:
- Preheat to 350°F and grease your mini muffin pan thoroughly or pop in some liners. Cold pans and ungreased cups are your enemies here, trust me.
- Combine your wet ingredients:
- Whisk melted butter and sugar together until they look combined, then add your eggs and vanilla and mix until everything is smooth and well incorporated. This step should take about a minute, no more.
- Bring the dry ingredients together:
- Sift your cocoa powder, flour, salt, and baking powder into the wet mixture, then stir gently until just combined. Stop stirring the moment you don't see streaks of flour anymore, or you'll end up with tough brownies.
- Fill and bake your mini muffin cups:
- Spoon batter into each cup until they're about two-thirds full, then slide the pan into the oven for 12 to 15 minutes, checking with a toothpick. When the toothpick comes out mostly clean with maybe a few fudgy crumbs clinging to it, you're done. Let them cool completely in the pan before touching them.
- Melt your chocolate for dipping:
- Combine chocolate chips and butter in a microwave-safe bowl and heat in 30-second bursts, stirring between each one until completely smooth and glossy. The melted chocolate should feel warm but not scorching hot when you test it with your fingertip.
- Dip your marshmallows like little hats:
- Poke a toothpick into the flat end of each marshmallow and dip it into the melted chocolate, coating it completely. Let the excess drip off for a few seconds before setting each marshmallow on a chocolate wafer cookie, flat side down.
- Let the chocolate set:
- Give the chocolate-dipped marshmallows a few minutes at room temperature to firm up, or pop them in the fridge if you're in a hurry. Once firm, they'll stay put on the cookies without sliding around.
- Create your hat band:
- Pipe a band of green icing around the base of each marshmallow where it meets the wafer cookie, then top with gold sprinkles or edible glitter for that leprechaun buckle effect. Let this set for a couple minutes so it doesn't smudge when you handle it.
- Assemble the final hats:
- Carefully place each leprechaun hat on top of a cooled brownie bite, pressing gently so it stays put. Remove the toothpick carefully by twisting it gently as you pull it free.
 Save
Save My sister asked me to make these for her son's kindergarten class party, and watching a line of five-year-olds light up when they saw the little leprechaun hats was honestly worth every minute in the kitchen. One kid asked if the hat was actually magical, and I told him it was magic because it made people happy, which seemed to satisfy him completely.
Storage and Make-Ahead Strategy
The brownies themselves keep beautifully for several days in an airtight container at room temperature, which is honestly one of my favorite things about this recipe. You can bake them a day or two ahead and decorate on the day-of if you're planning a gathering, or assemble everything the morning of if you want that fresh feel. The finished hats stay crisp and presentable for about three days if you store them carefully in a single layer with parchment between them.
Customizing Your Leprechaun Hats
I've played around with the icing color when we couldn't find green food coloring, so I mixed blue and yellow food coloring right in the bowl and ended up with this beautiful lime shade that honestly looked better than store-bought green. You can swap the chocolate chips for white chocolate if you want a lighter look, though I find dark chocolate keeps the hats from feeling too sugary. Some people use fondant instead of icing for the hat band because it sets faster and looks more polished, which is a smart choice if you're making these ahead.
Troubleshooting and Tips
If your marshmallows keep sliding off the wafers before the chocolate sets, try dipping them in melted white chocolate first as a base, then coating with your dark chocolate for extra grip. I once forgot to sift my cocoa powder and ended up with little lumps throughout, which honestly didn't ruin anything but was definitely noticeable in texture. For a gluten-free version, swap in your favorite gluten-free flour blend and use gluten-free wafer cookies, though you might need to bake them an extra minute or two since gluten-free batter sometimes needs that little boost.
- Keep your chocolate warm but not hot while dipping, or it'll coat unevenly and set too thick.
- If you want the hats to stick more permanently, add a tiny dab of melted chocolate to the top of each brownie before setting the hat on it.
- These freeze beautifully for up to two weeks, so bake and decorate them whenever inspiration strikes.
 Save
Save These little hats have somehow become our family's St. Patrick's Day non-negotiable, the thing people ask about and look forward to. There's something special about a dessert that brings people together and makes them smile the moment they see it.
Your Questions Answered
- → What type of chocolate works best for dipping marshmallows?
Dark or semisweet chocolate chips melt smoothly and provide a rich coating that hardens nicely around the marshmallows.
- → How can I ensure brownie bites stay moist?
Using melted butter and not overbaking helps retain moisture for fudgy brownie bites with a tender crumb.
- → Can I substitute regular flour for gluten-free flour?
Yes, gluten-free all-purpose flour works well, but adjust baking time slightly to prevent dryness.
- → What is the purpose of the wafer cookies in this dessert?
They serve as a sturdy, crunchy base to support the chocolate-dipped marshmallows, forming a hat shape on each bite.
- → How should leftover bites be stored?
Store in an airtight container at room temperature to maintain freshness and chocolate texture for up to three days.